Our amazing gorilla trekking in Uganda experience was part of our Exodus Chimps & Gorillas group tour. The actual gorilla trekking in Bwindi Impenetrable National Park was a similar experience to what any tourist would get. As part of the Exodus tour, we could sign up for 2 days of gorilla trekking, so I’ll share highlights and tips from each.
Bwindi Impenetrable National Park
Mountain gorillas in Uganda can be found in the Bwindi Impenetrable National Park. Within the park, there are four starting points or sectors – Ruhija, Rushaga, Nkuringo and Buhoma, each with different habituated (tourist-visitable) gorilla families. At the time of our visit, there were 5 families in Buhoma, 4 in Ruhija, 3 in Nkuringo and 7 in Rushaga.
We were in the Buhoma sector, looking forward to spending an hour with these magnificent creatures.
There is also an option to spend 4 hours with partially habituated gorillas in Nkuringo and Rushaga.
Day 1 – Easy Gorilla Trek
We left our hotel (Haven Lodge) around 7 am and had a short 10-minute journey to the welcome centre. We were the first tourist group to arrive, but our tour leader, Sam, was already there. As somebody in our group was worried about the trek, he wanted to ensure we were assigned to an easy trek if at all possible (I suspect some money changed hands to achieve this).
The rangers and trackers have an idea of where the families are from day to day. Clearly, there is no guarantee, but there are 3 unofficial levels of trek – easy, medium or hard, based on the length of the trek, but also how hilly a trek is and how uneven the terrain is. It’s quite important to be assigned an easy one if you have mobility issues.
Walking Poles Tip
 Even on an easy trek, take advantage of any sticks you can borrow from your hotel. We were able to borrow a thick stick, which was invaluable, particularly on day 2, as it helped us navigate the steep inclines.
Some of our group preferred to use their own walking poles, which worked out fine, but the guides were concerned they would be too flimsy for the terrain.
There was no charge to borrow the sticks from our hotel.
Around 7:30, once other tourists had arrived at the welcome centre, we watched a community dance for half an hour. Each community group in Buhoma is invited to dance each day to advertise their cause and raise funds.
Following that, we had a general safety talk from the lead guide and a medical talk by a representative of the community hospital to address first-aid concerns and learn about the hospital facilities.
By this stage, the nervous anticipation was definitely building and really ramped up when we were finally split into our trekking groups.
Each of the five gorilla families is assigned 8 tourists (or 9 in our case, as there were 9 in our tour group) along with a guide and armed guards. Guards are assigned to the groups in case we come across forest elephants, which are known to be aggressive – the guards would just shoot into the air to scare them away. It also protects tourists in case of raids from the Democratic Republic of Congo, the border being a few km away.
Meeting our guide, Joy, and finding out the family we were going to see, Binyindo, was a family of 9, including a month-old baby, seemed too good to be true!
This was the time that we indicated whether we wanted a porter. Joy also checked that we each had a facemask – mandatory for visiting the gorillas. Sam, our tour leader, gave us masks, but it wasn’t clear whether we could buy them at the welcome centre. You might want to bring them with you.
Notes about porters
Although optional, hiring a porter for your trek is a way of giving money directly to the community, so it is recommended even if you don’t think you will need one. Our porter carried our bags, helped us traverse the uneven terrain and held our bags and stick when we visited the gorillas.
The price of a porter is $20 (cash). US dollars are preferable, but shillings are accepted.
You pay the porter (plus any tip – see later) at the end of the trek.
I was surprised to learn that we would be driving up the mountain before we started our trek – an element of making the trek ‘easy’.
We drove up for around 45 minutes and parked on the side of the road. We met our porters, who each selected a tourist to help and took our bags as we set out on our trek.
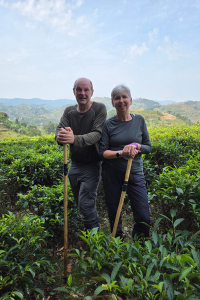
From the road, we walked up a short hill into a tea plantation alongside the forest. We walked slowly through the tea plantation in single file. As we walked, Joy created anticipation that the trackers were working to find the gorillas as well as reassurance that we would all be able to do the trek. After about 20 – 30 minutes of gentle walking through the tea plantation, we turned onto a steep track down through the forest. Halfway down the hill, we were told to put on our masks and give our stick to our porter – we could glimpse a gorilla through the bushes at the bottom of the hill….
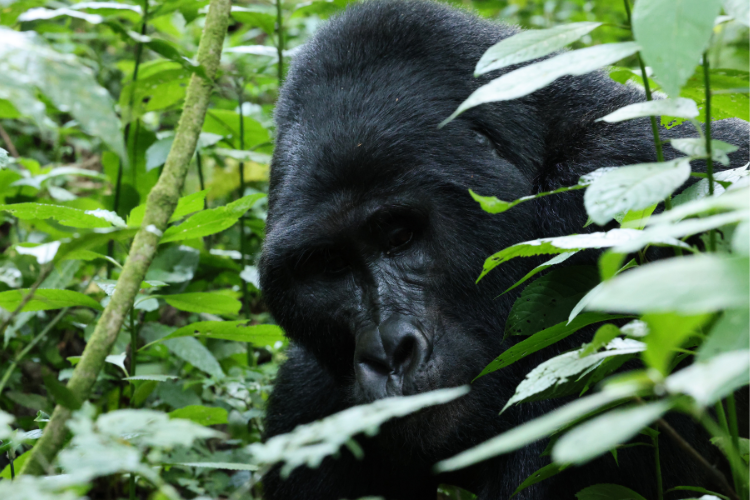
Masks on and cameras at the ready, we continued down the hill to a flat, meadow-style open area – and wow- there they were…so close…Initially, I could see a Silverback, two females, one with the baby and some adolescent males dotted around eating.

We could actually walk amongst them! The trackers, who met us there, were happy for us to get quite close – we couldn’t take photos and videos quickly enough! I really didn’t expect to see them in such an open space.

The gorillas were really calm – even mum was happy for us to see her young, tiny baby.

It felt very surreal as we walked from gorilla to gorilla.


The hour was over all too quickly, and we climbed back up the hill, through the tea plantation and back to the truck.
What an experience!
Tipping the porter
As mentioned, the porter costs (US) $20. A minimum tip expectation would be $5 each. The porters get an opportunity to work 2 or 3 times a month. Our tour leader suggested a tip of $10 – $20. We decided to give a $10 tip to each of our porters on day 1 and a $20 tip to each on day 2, as it was a much longer trek
Day 2- Medium Gorilla Trek
On our Exodus tour, the day 2 gorilla trekking was optional, but I’m so glad we booked it. There are only so many permits available each day (around 40 in Buhoma), so you must book the 2nd day early (when you book the tour) if you want to do it. Personally, I thought the day 2 experience was even better than day 1.
Not all our tour group did day 2, but those that did agreed that we would ask our tour leader, Sam, to see if he could get us assigned to a family who were a medium trek.
Now, they clearly can’t guarantee exactly where the Gorillas are when you’re setting out, and the family may move while you are walking, but they do have a basic idea of how long the walk is likely to be.
We arrived at the Welcome centre early again (Sam was there even earlier, ensuring we were allocated an appropriate trek).
Once we had met our guide, guards and fellow trekkers (there were 6 of us and 2 others), we drove about 30 minutes to the other side of the mountain. There were a couple of groups starting from this point to visit different families.
Once the porters arrived, we started to climb – probably about half an hour straight up. We then walked around the mountain and straight up again. All in all, we walked for about 1.5 hours (mostly up) before suddenly stopping… we had reached the trackers and our family – the Mubare.
Masks on, and cameras at the ready, we walked around a bush, and there was the silverback mating with his female! Our guide said he only saw this once every six months or so!

There followed the most amazing hour following the Silverback and other family members through the bush!

Throughout our hour with the gorillas, the guide and trackers were keen to ensure the whole group had an amazing experience and were constantly hacking down branches to give us an unrestricted view and made sure we found the best places to see.
The Silverback was clearly feeling very pleased with himself and did a lot of posing – at one point, the trackers sat me down directly opposite the seated gorilla.
Quite an awe-inspiring experience to be at the same level as such a powerful, but gentle creature.

Unlike day 1, we ‘tracked’ the gorillas as they moved through the forest. It wasn’t far, but it was quite quick and rough terrain underfoot. It was particularly magical to see the gorillas (baby and silverback in the trees).
All too soon, the hour was up, and we had to leave the gorillas in peace.
We walked back down the mountain to the welcome centre, stopping for a packed lunch (provided by our hotel) at some small wooden benches around halfway.
The walk back was about 1.5 hours with a 30-minute stop for lunch. The way down the mountain was pretty steep, but it was easily achievable – I just took my time.
Essentials
I cover general essentials of the trip to Uganda in this post, but to outline the gorilla-focused ‘things to know’
Tips
I’ve already outlined how much we tipped the porters. The trackers and the guide also need to be tipped. The trackers are tipped as you leave the gorillas, and the guide tip is given (along with the porters) at the end of the trek.
As part of our tour, we all contributed to a central tip kitty to cover all the tips on the trip. Looking at the breakdown of how this was spent, the guide and trackers on each day received around £60 to split between them.
Insect repellent
On much of the trip, we used DEET, but were told not to on the gorilla trekking as it can attract wasps. We were there in February and didn’t get any bites during the trek.
Fitness
As already mentioned, our tour leader ‘negotiated’ a certain level of trek for us.
One thing to remember if fitness is a concern is that the porters will support you as required. We spoke to one lady who had MS, and she had hired two porters who ‘pushed and pulled’ her up and down the hills. I’m not sure which level of walk she did, but she successfully saw the gorillas!
What to bring on the trek
- Camera – mobiles work (the videos were taken with a Galaxy S25), alternatively, a medium zoom (70 – 200mm / 75 – 300mm) would work.
- Long-sleeve trousers and T-shirt (in muted colours)
- Gloves – we had these with us, but didn’t use them. I can imagine, depending on which trek you are on, you might need them. I noticed the guides did have gloves in their packs
- Pole/walking stick
- Good walking boots/shoes – the ground is uneven underfoot and could be muddy. I would recommend some ankle protection and non-slip soles
- Waterproofs – the weather was warm but changeable, and it could rain at any moment, so waterproof clothing was essential, as was a waterproof cover for your day rucksack.
Any Questions?
If you are planning to see the gorillas and have questions that I haven’t answered, do contact me at mary@thomasadventuremusings.co.uk, and I’ll do my best.
My best advice – do it! It really is an unforgettable experience!